 |
| 9V battery caddy for powered up hub with USB-rechargeable Li-ion battery |
It's a decent part as far as it goes.... except for the batteries. 6xAAA cells, and it doesn't like NiMH rechargeables much.
So I designed a replacement 3D-printable battery caddy that adapts it to a regular 9V form factor. You can then use with a micro-USB Li-ion rechargeable block battery. No soldering or fiddling with electronics required. See below for details.
Why was this even necessary?
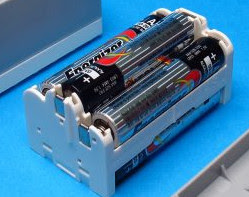 |
| Hub battery caddy Image by The Brothers Brick |
 |
| Powered Up Hub 88009 |
Replacement caddy design for rechargeables
 |
| Micro-USB rechargeable 9V battery in commonplace PP3 form factor |
The battery gobbling hub annoyed me, so I fixed it to take a single 9V battery (PP3) by designing a 3D-printable replacement battery caddy that you can swap for the original one. It's easy to get micro-USB-rechargeable Lithium-Ion 9V batteries with their own internal voltage regulator, discharge limiter, current limiter, charge controller, etc, so this provides a cheap and easy conversion of your Lego Powered Up hub to a fast-recharging, long-lived power supply.
An 8.4V or 9.6V NiMH cell should work too, but I don't have any to test.
This caddy design is keyed to prevent insertion of the battery with the wrong polarity. It has some isolating material to prevent the contacts from shorting. It fits the battery securely and neatly, and prevents it rattling around. The contacts with the hub work well. The caddy has the appropriate keying and clip notches to fit into the hub neatly.
Parts and tools required
- One or more 9V Li-Ion battery packs. You can test with a regular alkaline or NiMH 9V though.
- Access to a 3D printer for about 4h of print time
- A little bit of metal plate to cut and bend for the contacts. I recommend 0.5mm copper plate but it's likely you could use brass, aluminium, steel or whatever you have to hand. Exact thickness is not critical.
You will need to 3D print the caddy.
Download the latest STL from my github repo (at time of writing, lego_powered_up_battery_box_v5.stl).
Printing in PLA should work fine, it's not especially difficult or fiddly. Configure your slicer to print overhangs slowly if you want the clips to function well, otherwise it's just the usual quality/time trade-offs. Dimensional accuracy matters, so avoid filaments that shrink a lot or be prepared to do some trimming. I recommend printing with a brim.
Once printed and trimmed, you will need to make some contacts. Cut two 4mm x 15mm strips of suitable 0.5mm thick metal. Err on the side of narrow (<4mm) not wide. Length isn't critical.
Line up one contact as it will in the caddy, diagonally across from the +ve battery contact across to the centre caddy contact. You will see a little diagonal channel to help you. On one end of the strip, mark and clip the ends so they will sit nicely in the contact pad guide once the strip is inserted. I used side cutters. Then insert one strip into the middle (+ve) contact slot near-vertically and once inserted, turn it around until it's firmly in place. Glue if desired.
Insert the second strip vertically into the -ve slot. Mark it where it sticks out past the top of the contact cutout. Remove it and fold it over at that point, so it doubles back on itself. Crush it flat at the fold with pliers. Reinsert it and make sure it engages with the little cutout the bottom of the caddy. Glue if desired.
Make sure both contacts fit the battery terminals.
Check the fit of the caddy in the hub box. Trim, shave or sand the keying ridges if required.
Enjoy.
(For the contacts I actually cut a short length of copper pipe then flattened and thinned it out in a rolling press. But it's probably easier to just buy a little copper plate from a hobby shop.)
Related work
Unlike Philo's LiPo conversion this one can be done with an off-the-shelf battery that provides all required voltage regulation and charging circuits internally. Just plug in a micro-USB connector and you're done. (In any case I didn't find his conversion until I'd already completed this one - I originally intended to take the same approach he did with a separate voltage regulation circuit etc, but then found out about these handy all-in-one units).
While writing this article I also stumbled across a eurobricks post that details a simple conversion done by adapting a regular 9V battery clip to the Powered Up contacts layout. I chose not to take this approach mainly because I wanted polarity protection and a nice snug fit where the battery wouldn't rattle around.Why would Lego design it this way?
The cutoff voltage in the hub is not completely unreasonable - when over-discharged, alkaline batteries are more prone to leaking and splitting, which can potentially be hazardous and/or damage the contacts.
But the hub has a separate battery caddy so it's pretty well protected from leakage.
So I suspect they designed it for a 5V supply with headroom for a simple linear voltage regulator.
I'm very disappointed that Lego has not released their own rechargeable battery module for these units. It has a swappable internal caddy, and you'd think that a USB-rechargeable battery pack would be a no-brainer product for them to release.